Affiliate Links Disclaimer: This blog post contains affiliate links and I make a small commission off any purchase you make when you click on them.
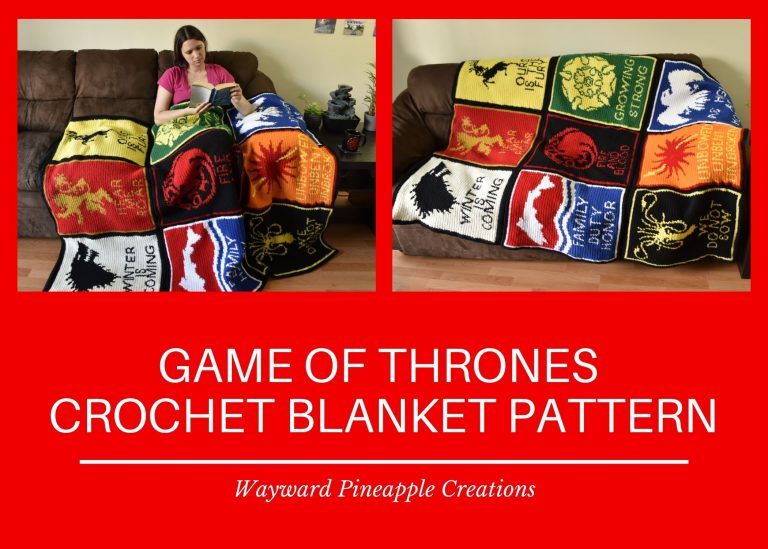
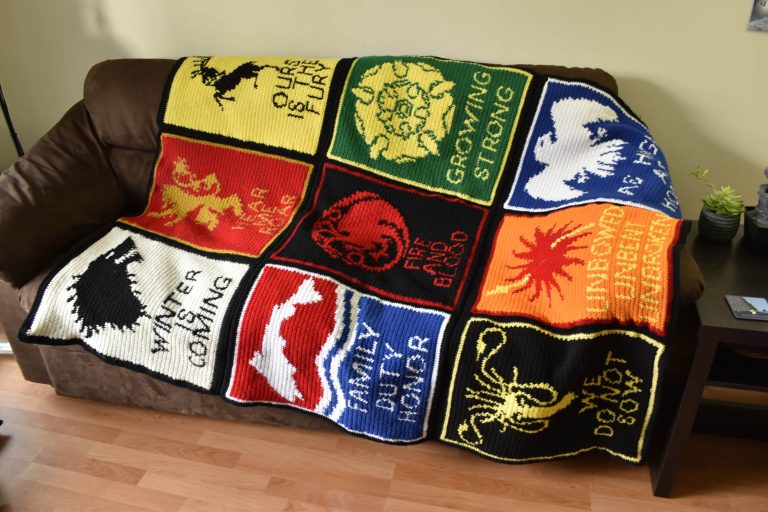
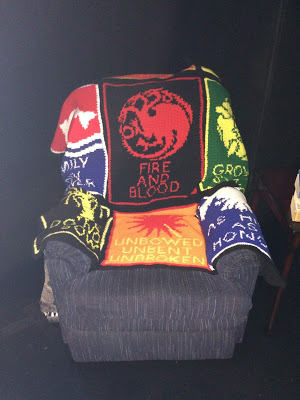
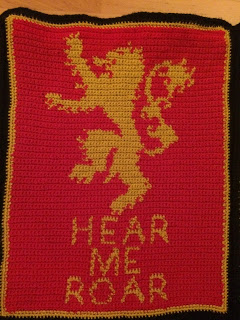
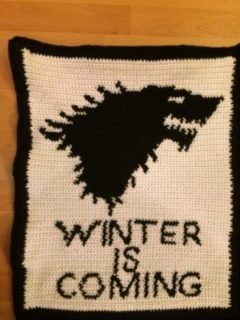
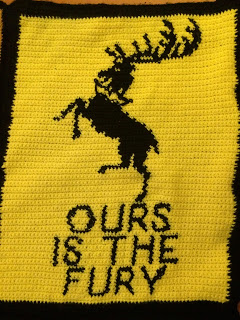
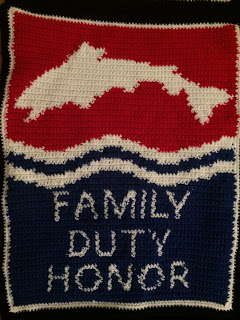
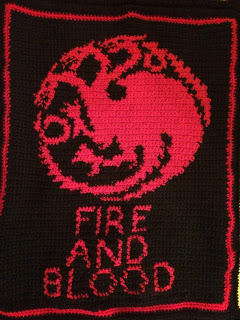
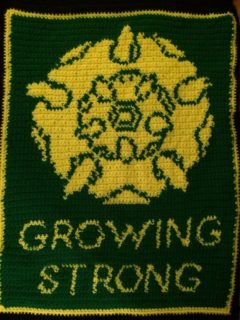
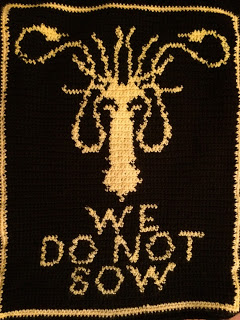
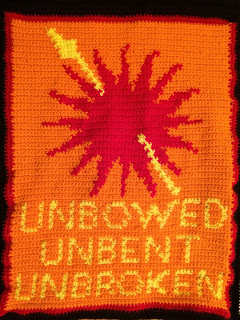
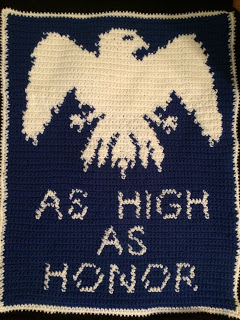
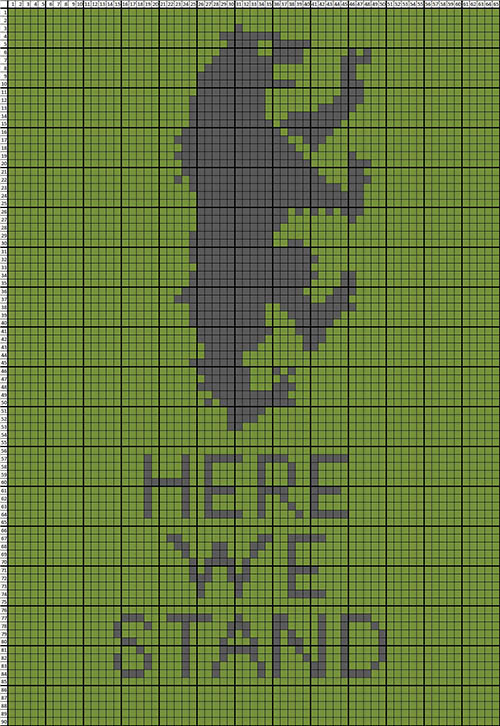
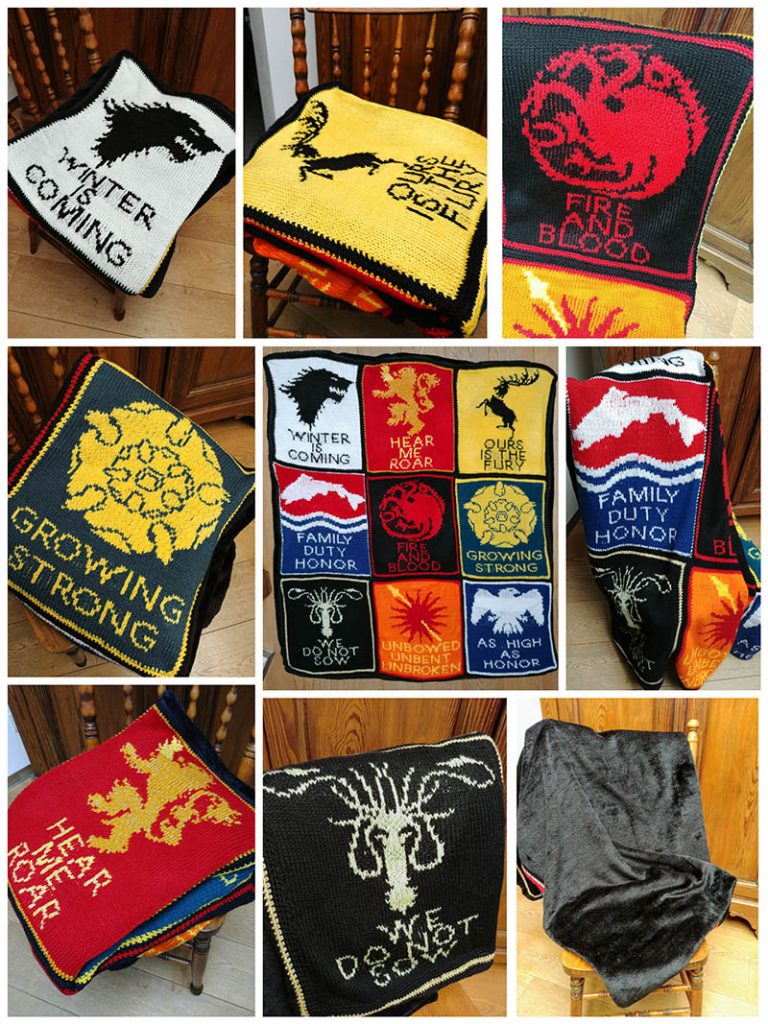
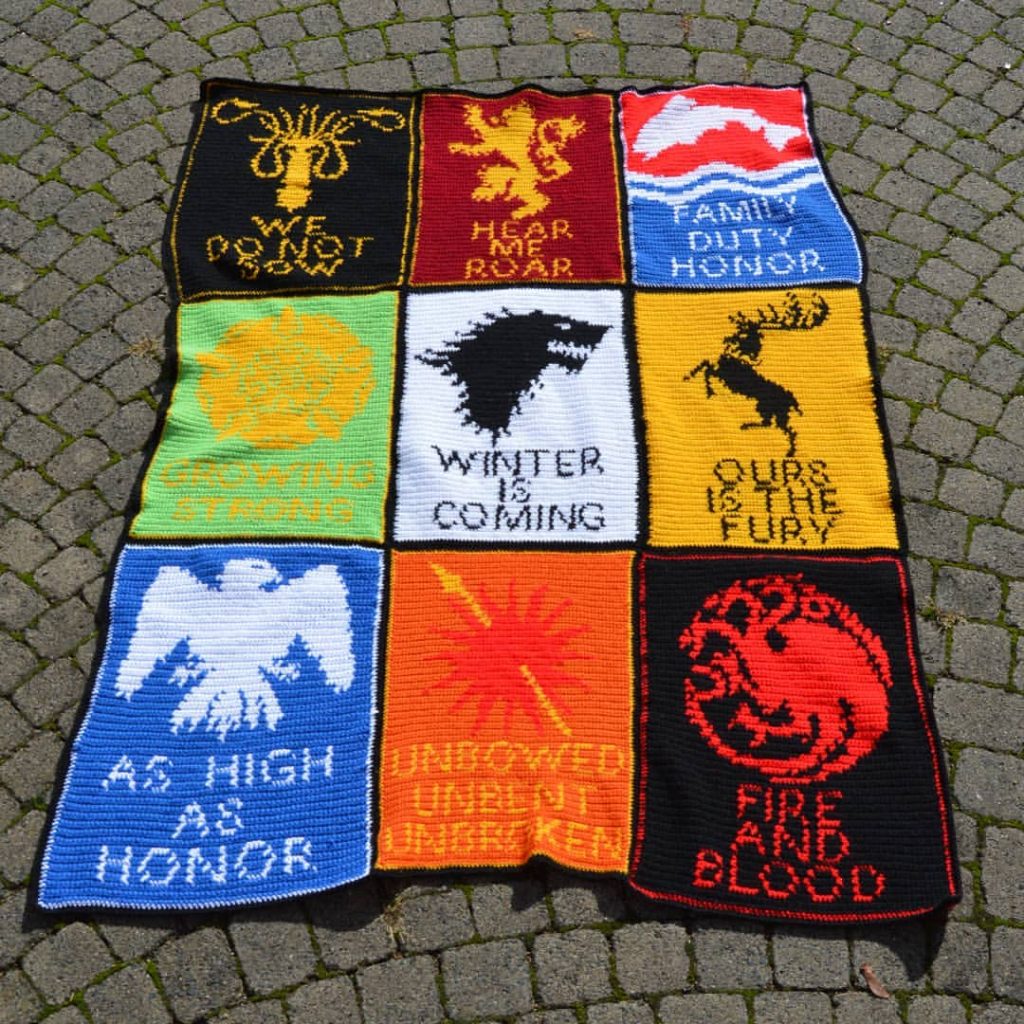
Winter is coming! Cozy up under this Game of Thrones house sigil crochet blanket for your next binge watch of the show, or re-read of the books. 11 charts are included in the pattern: Stark, Lannister, Baratheon, Targaryen, Greyjoy, Tully, Tyrell, Martell, 2 versions of Arryn, and a bonus Mormont chart!
Read on for more information on my Game of Thrones crochet blanket, the charts in PDF and JPG formats, and instructions on how to read the charts and construct the blanket. Or click here to skip straight to the charts!
The Story of My Game of Thrones Crochet Blanket
I still maintain that this blanket happened by accident, and also that it’s my friend Sam’s fault. One sunny weekend in May 2013, my local Vancouver nerd Meetup Group/nerd family had a ‘Nerds in Public’ crafting event at Queen Elizabeth Park. I had just fallen hard in love with Game of Thrones, and I wanted to make something GoT related. I didn’t feel like making dolls (yet), though, and I couldn’t decide what I wanted. So on the way to the event, I mused to myself on the bus and offhandedly thought: “Wow, a blanket with a bunch of house Sigils would be cool! Haha yeah right, that would way too much work.” I arrived at the event and told my friend Sam my idea while we waited for everyone else. She was, of course, supposed to say: “That’s insane, what’s wrong with you?!”
Instead she said: “Oh my god you HAVE to make that!”
Dammit.
On my way home that day I found myself considering the idea more closely, although I was still firmly in the camp of “I’m definitely not making this”. But hypothetically… Which houses would I include? And in what order would I arrange them? Two houses with black backgrounds couldn’t be next to each other, but neither could red (Martell) and green (Tyrell) because they would look too Christmas-y. And thematically speaking, which houses should be next to each other? Stark should be on the top, and I wanted Lannister next to Stark, and I figured Baratheon should be on that top row with therm. I decided to give Targaryen a place of pride in the centre of the blanket. But beyond that… There was so much to think about! Especially for a blanket I absolutely, definitely, was not making.
Fast-forward to my next shopping trip to Michaels. I figured I might as well pick up some more black yarn, and some off-white as well, in case I wanted to try out a Stark panel. Just to see how it would look, you understand, as a matter of simple scientific curiousity. And then, of course, I had to make the pattern. Cue a few hours of trying to figure out how to turn a picture into a crochet graph.
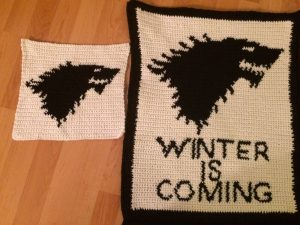
My first attempt was too small. Way too small.
My first (far too small) version on the left VS the final version on the right
Not only that, but with so few squares per graph there was no way that the Targaryen sigil was going to be detailed enough to look good. So back to the drawing board, where I more than doubled the size of the graph and decided to add the words. Just to, you know, make things more complicated for myself. For the blanket I was in no way, shape, or form, planning to make.
One year later I had a blanket.
It’s super heavy because I lined the back with fleece to hide all my colour changes, far warmer than I need in my apartment, and both too small for my bed and too big for my couch. And I don’t care because I love it. 🙂
My Game of Thrones Blanket on the Move!
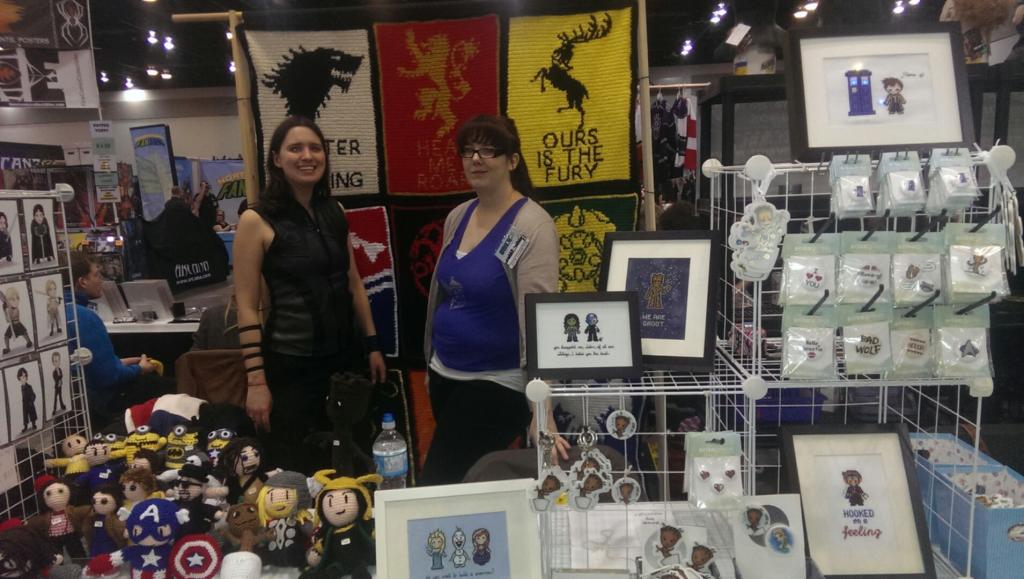
In the years since I first completed my Game of Thrones blanket, it’s gotten around a bit! The blanket has been my faithful backdrop to my Artist Alley booth at multiple FanExpo Vancouver conventions, where I display it using this nifty wooden structure my friend Peter made for me.
FanExpo Vancouver 2015 - Me and my dolls on the left, my friend Erika and her amazing cross-stitch creations on the right.
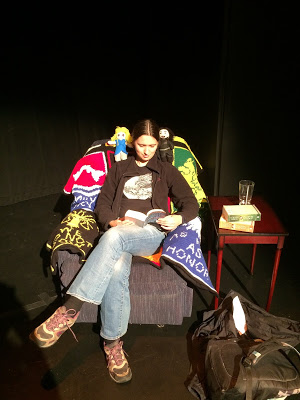
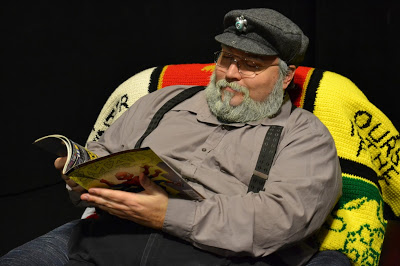
And then in 2015, my blanket made its stage debut in We Know Nothing: Monologues of Ice and Fire, a Vancouver-produced comedy show (spoiler alert: it played the role of The Blanket). My blanket got to hang out on stage for the entire show, draped over the chair that seated ‘George RR Martin’. Well the actor playing him, at any rate – I can only dream that one day the real one would sit on it! I took a few pictures after the show of me with my Jon & Daenerys dolls sitting in the chair, plus there are some official photos below of ‘George’ in the chair.
Game of Thrones Crochet Blanket Pattern
Below you will find instructions on how to read the charts and construct the blanket.
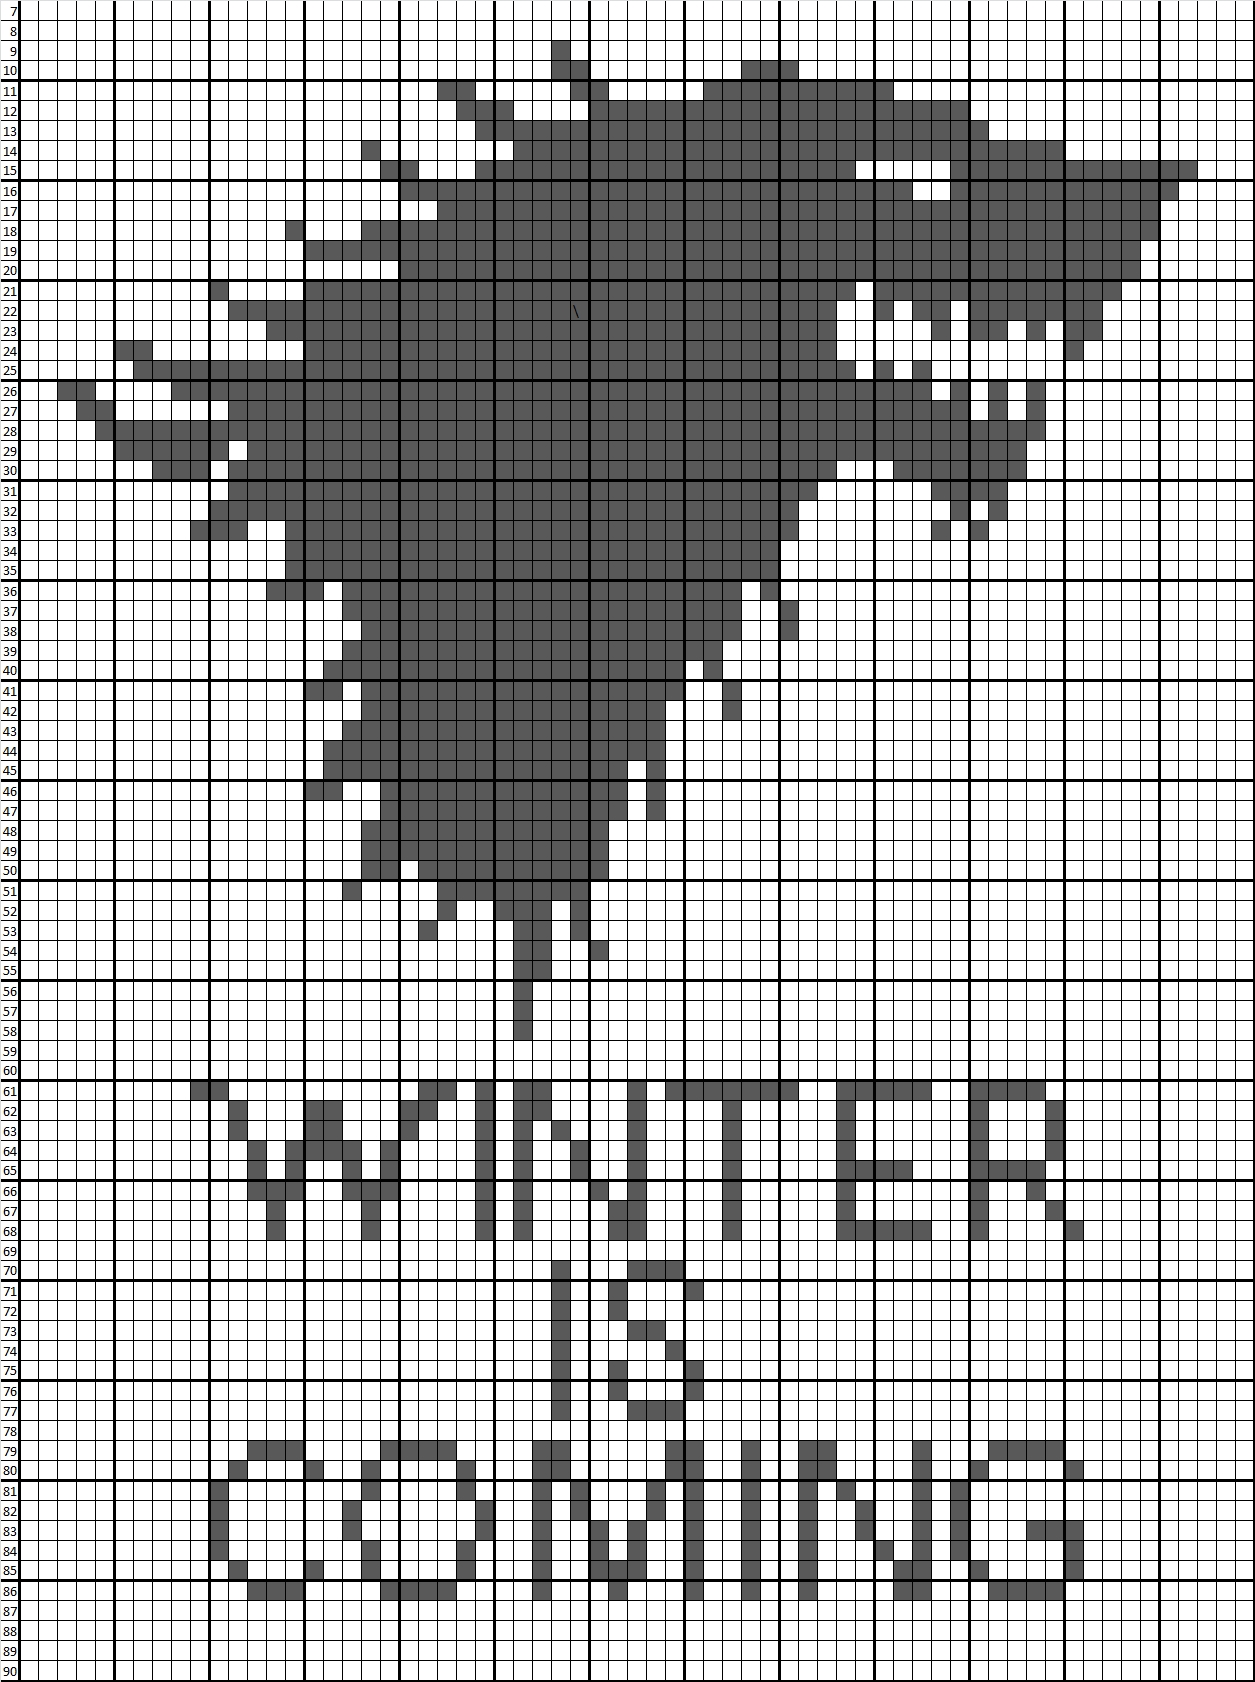
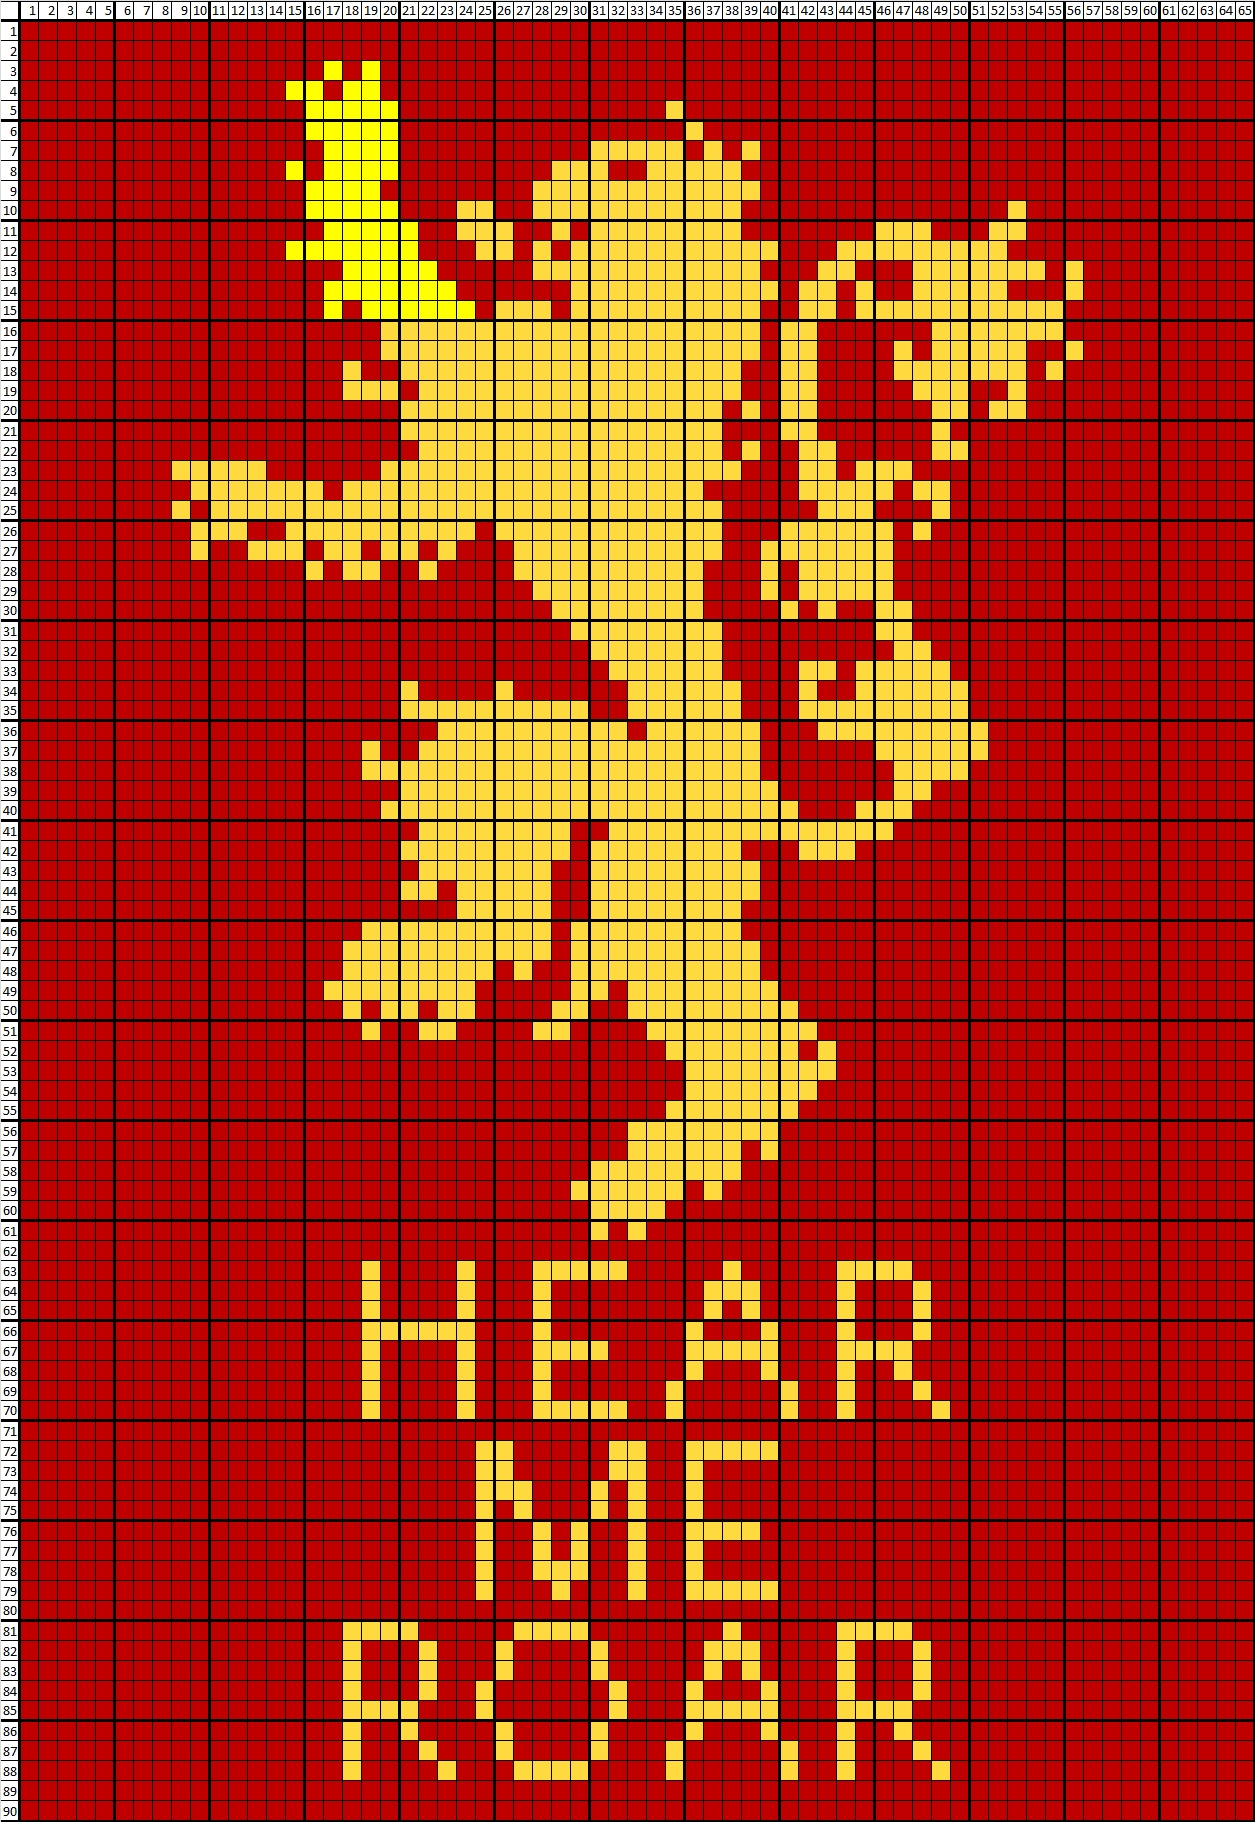
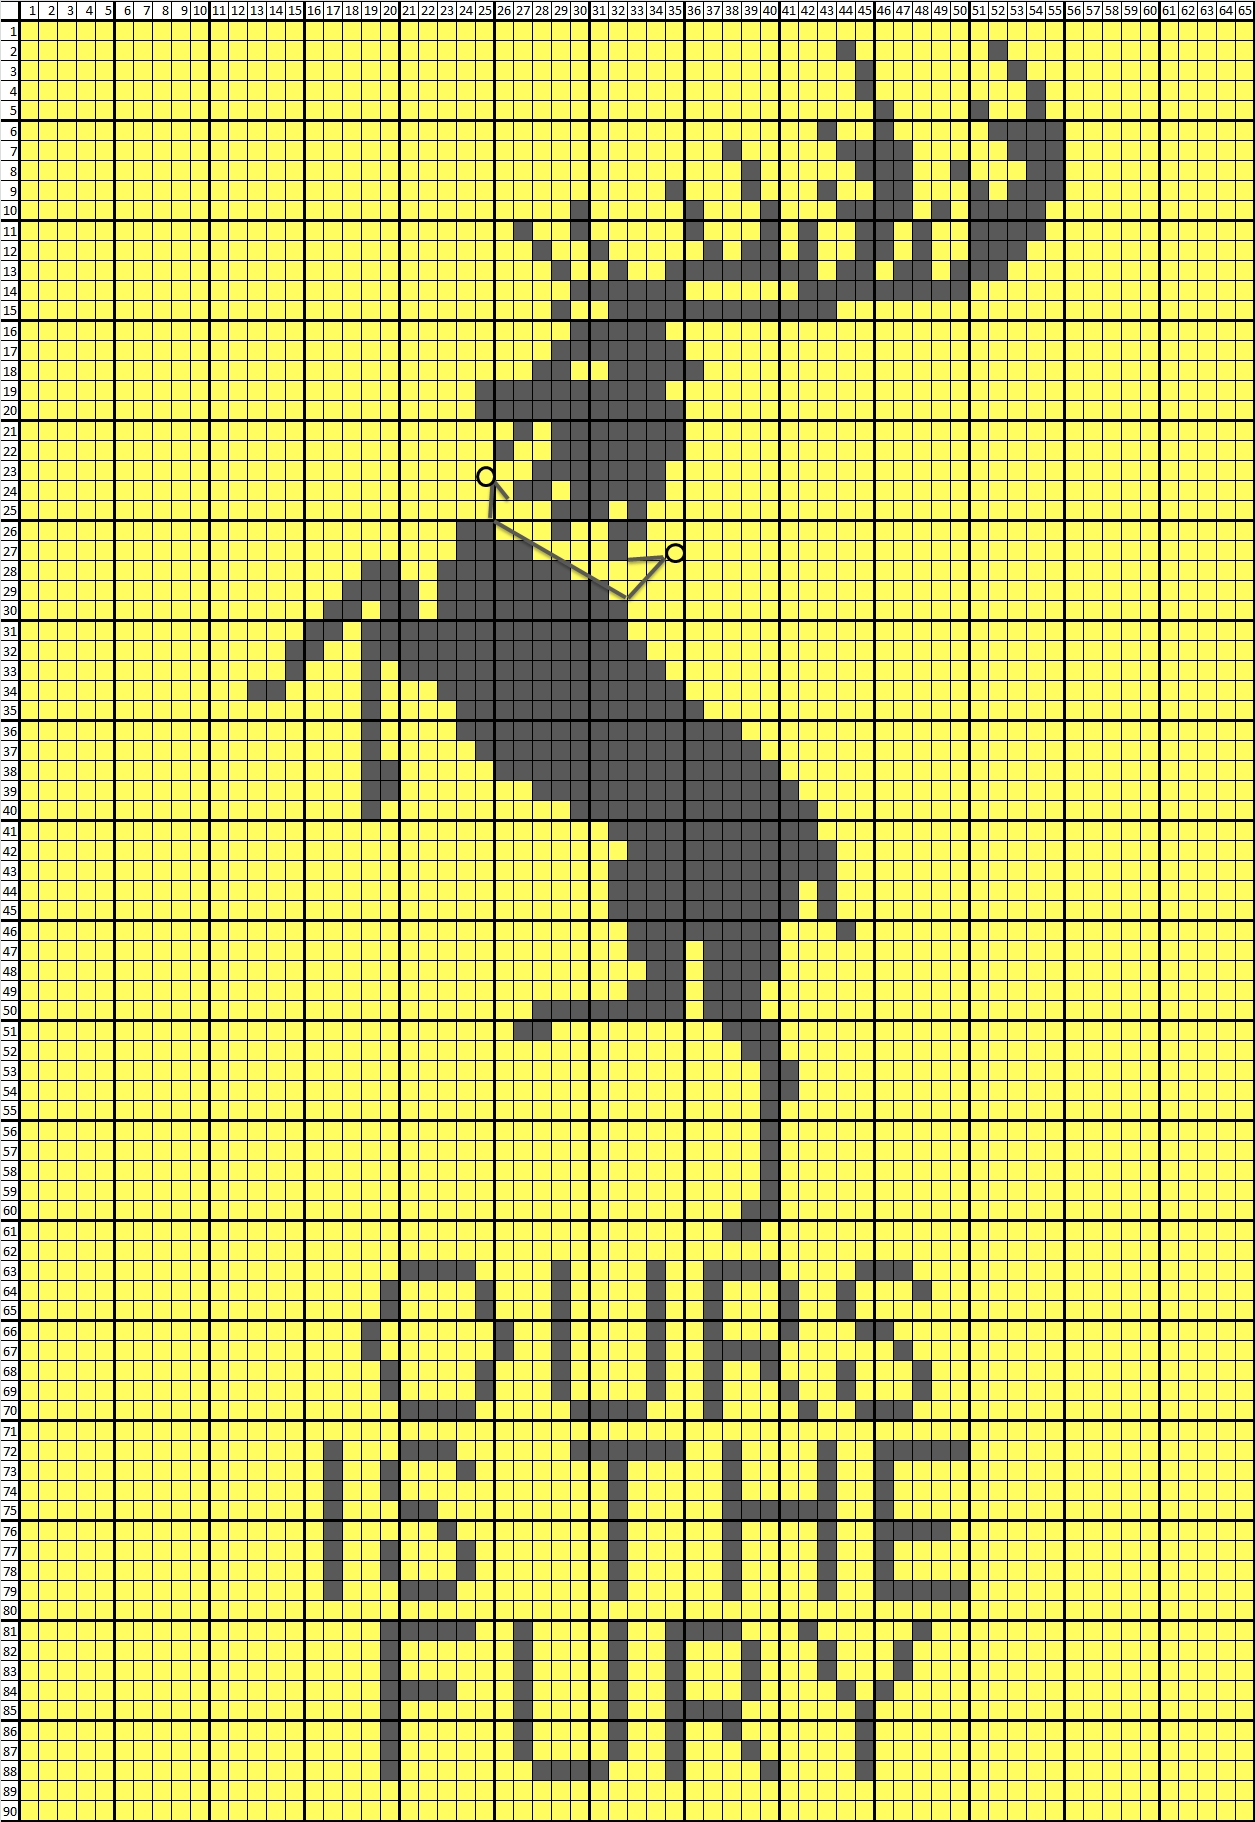
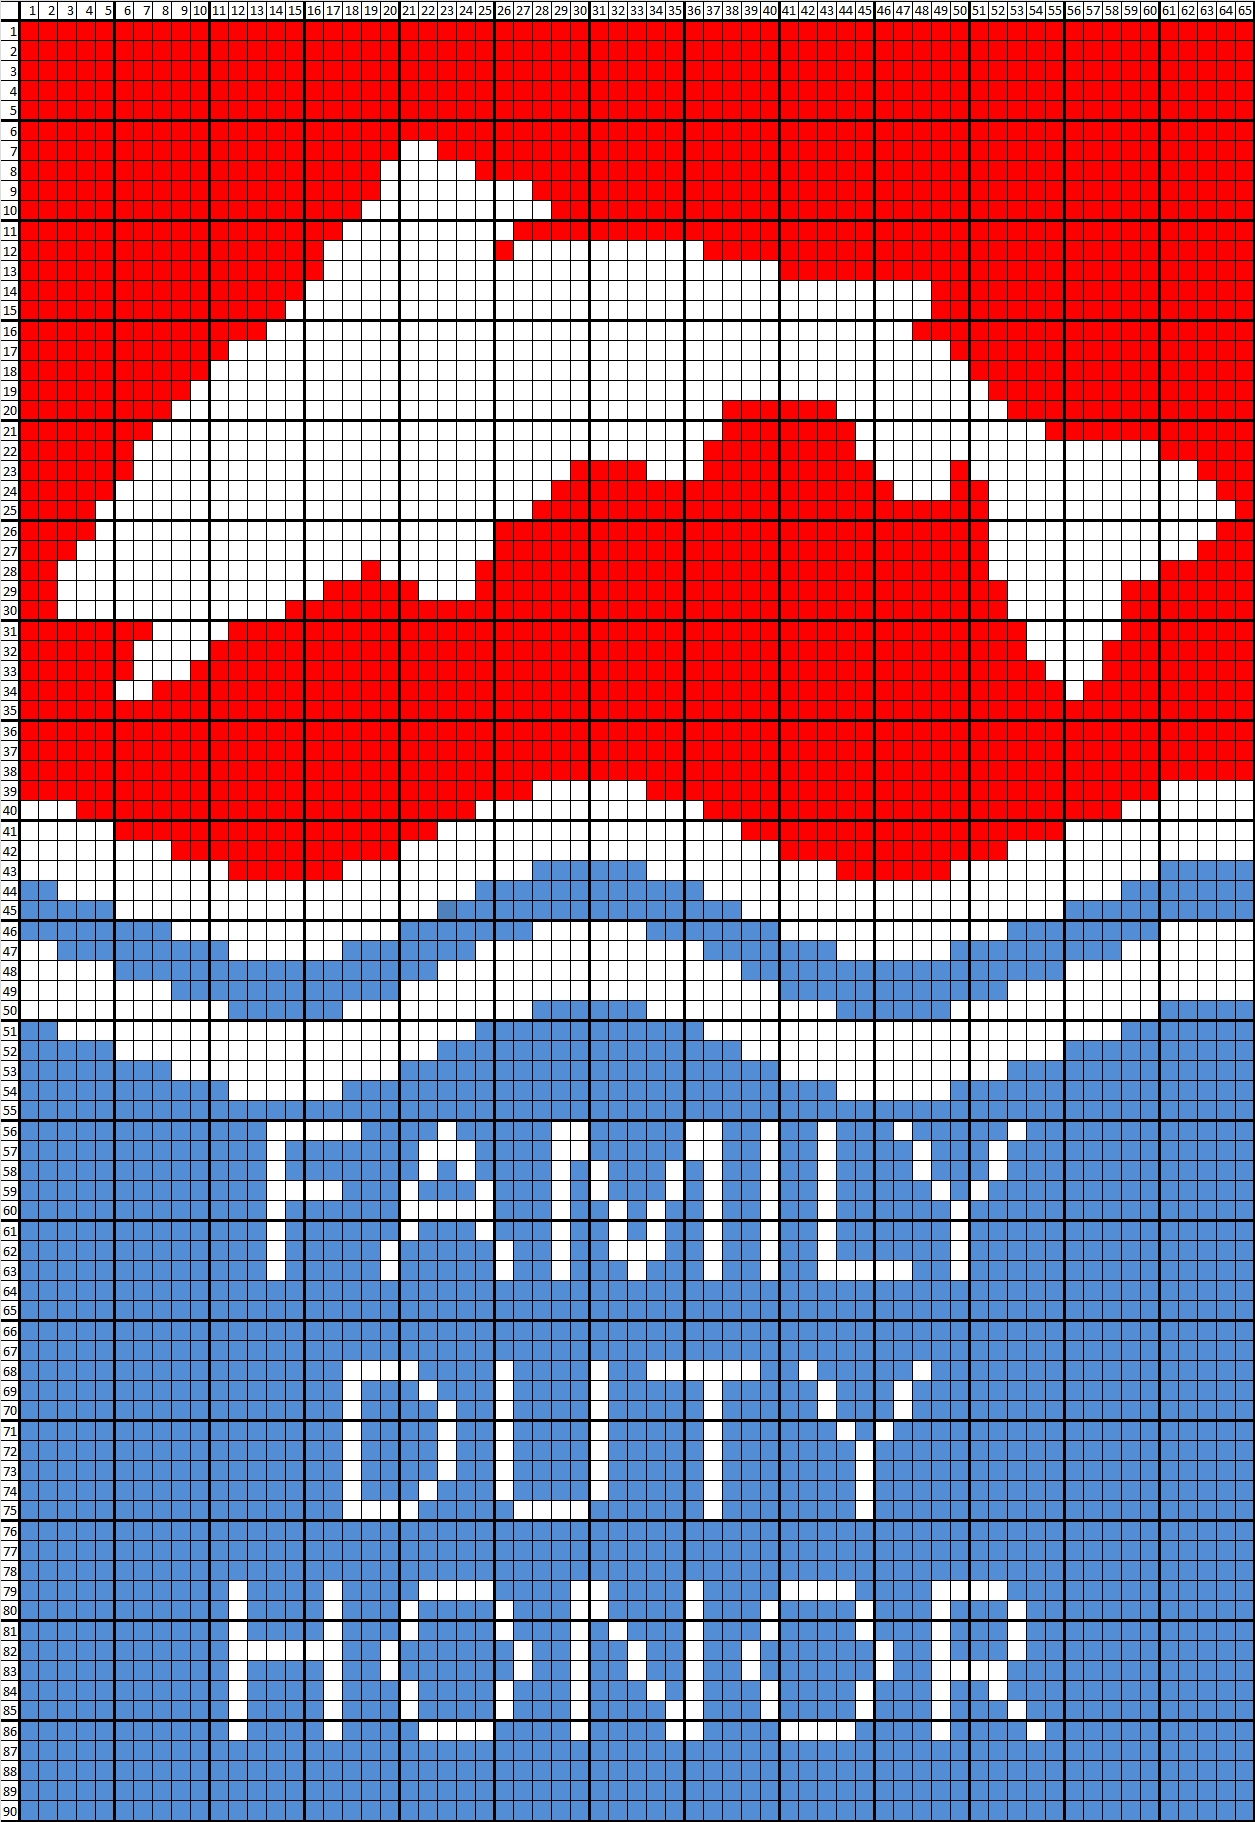
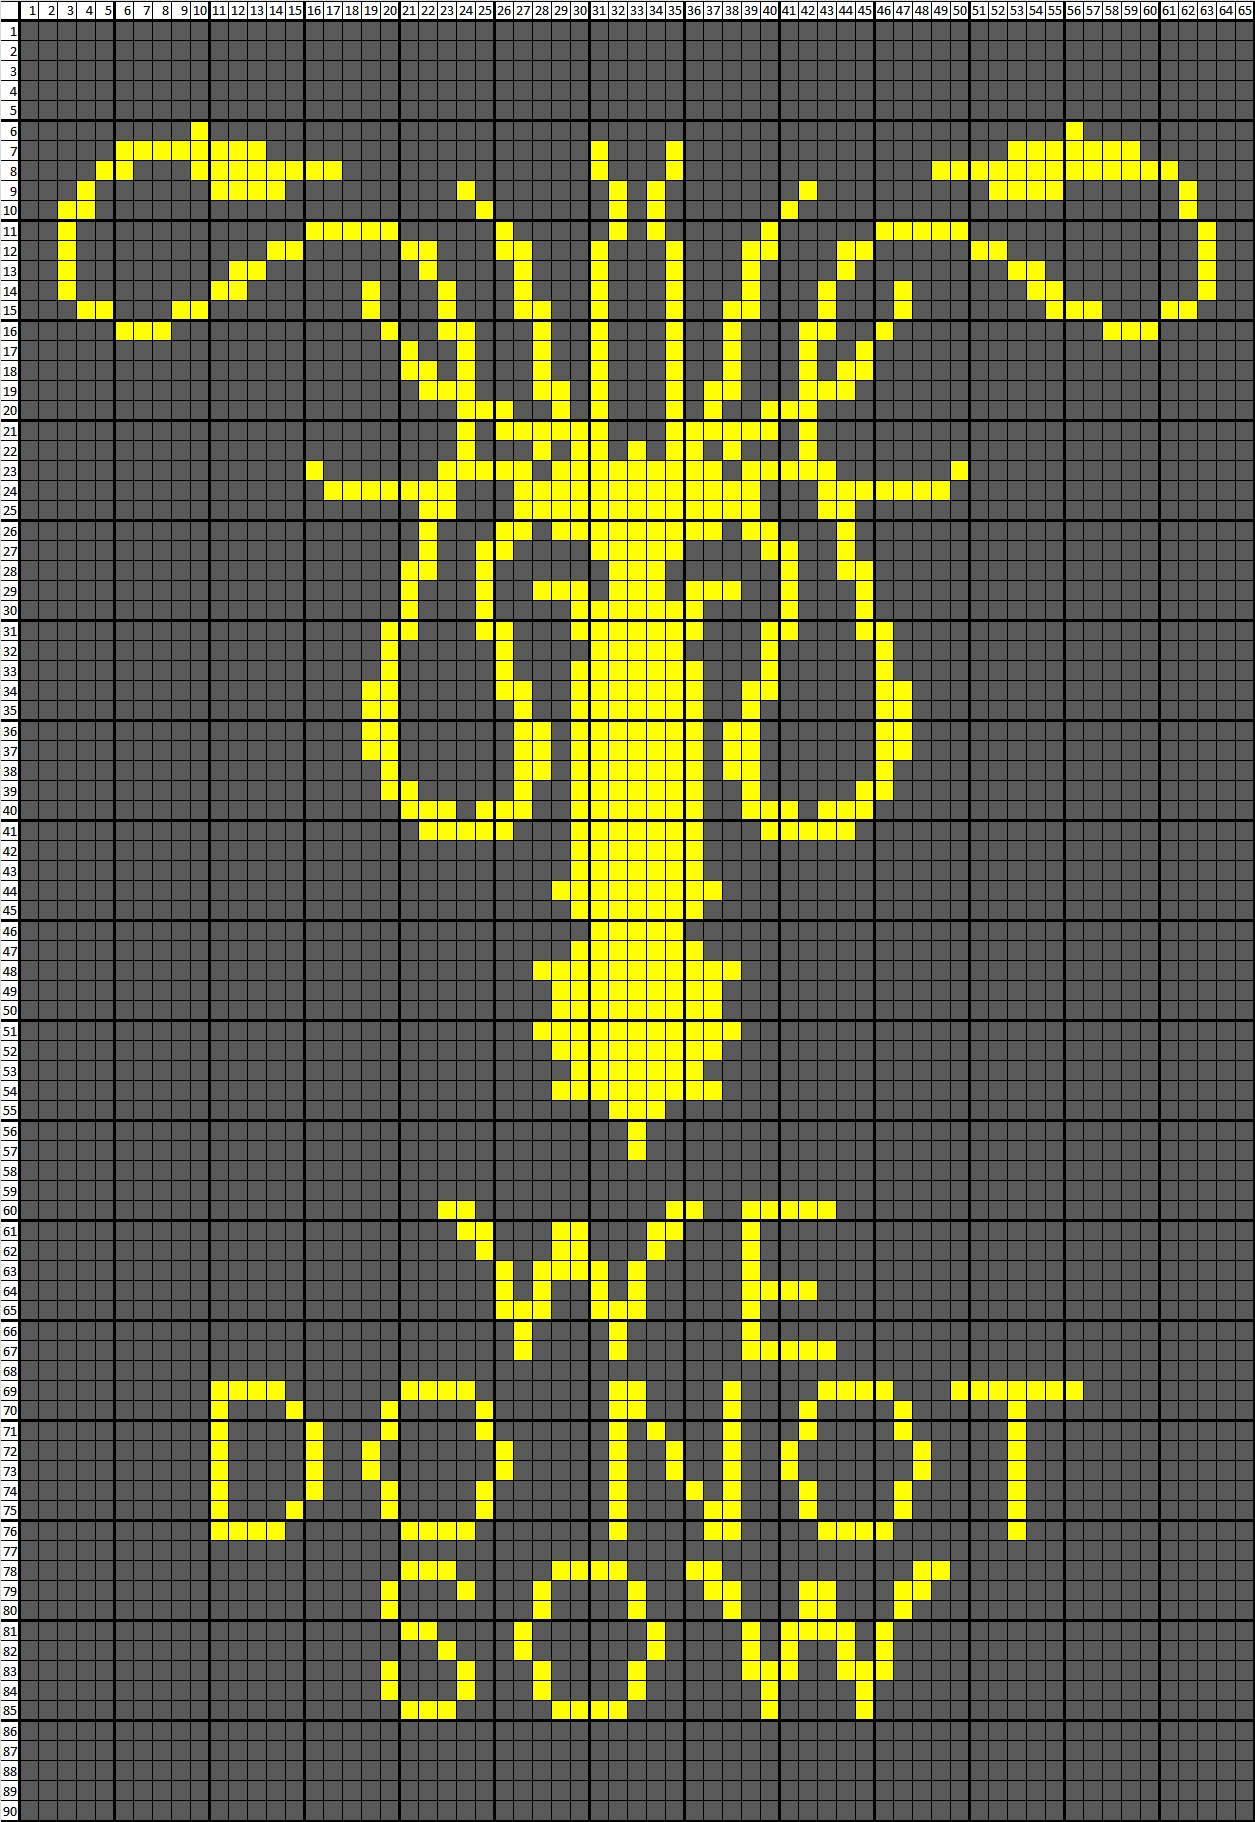
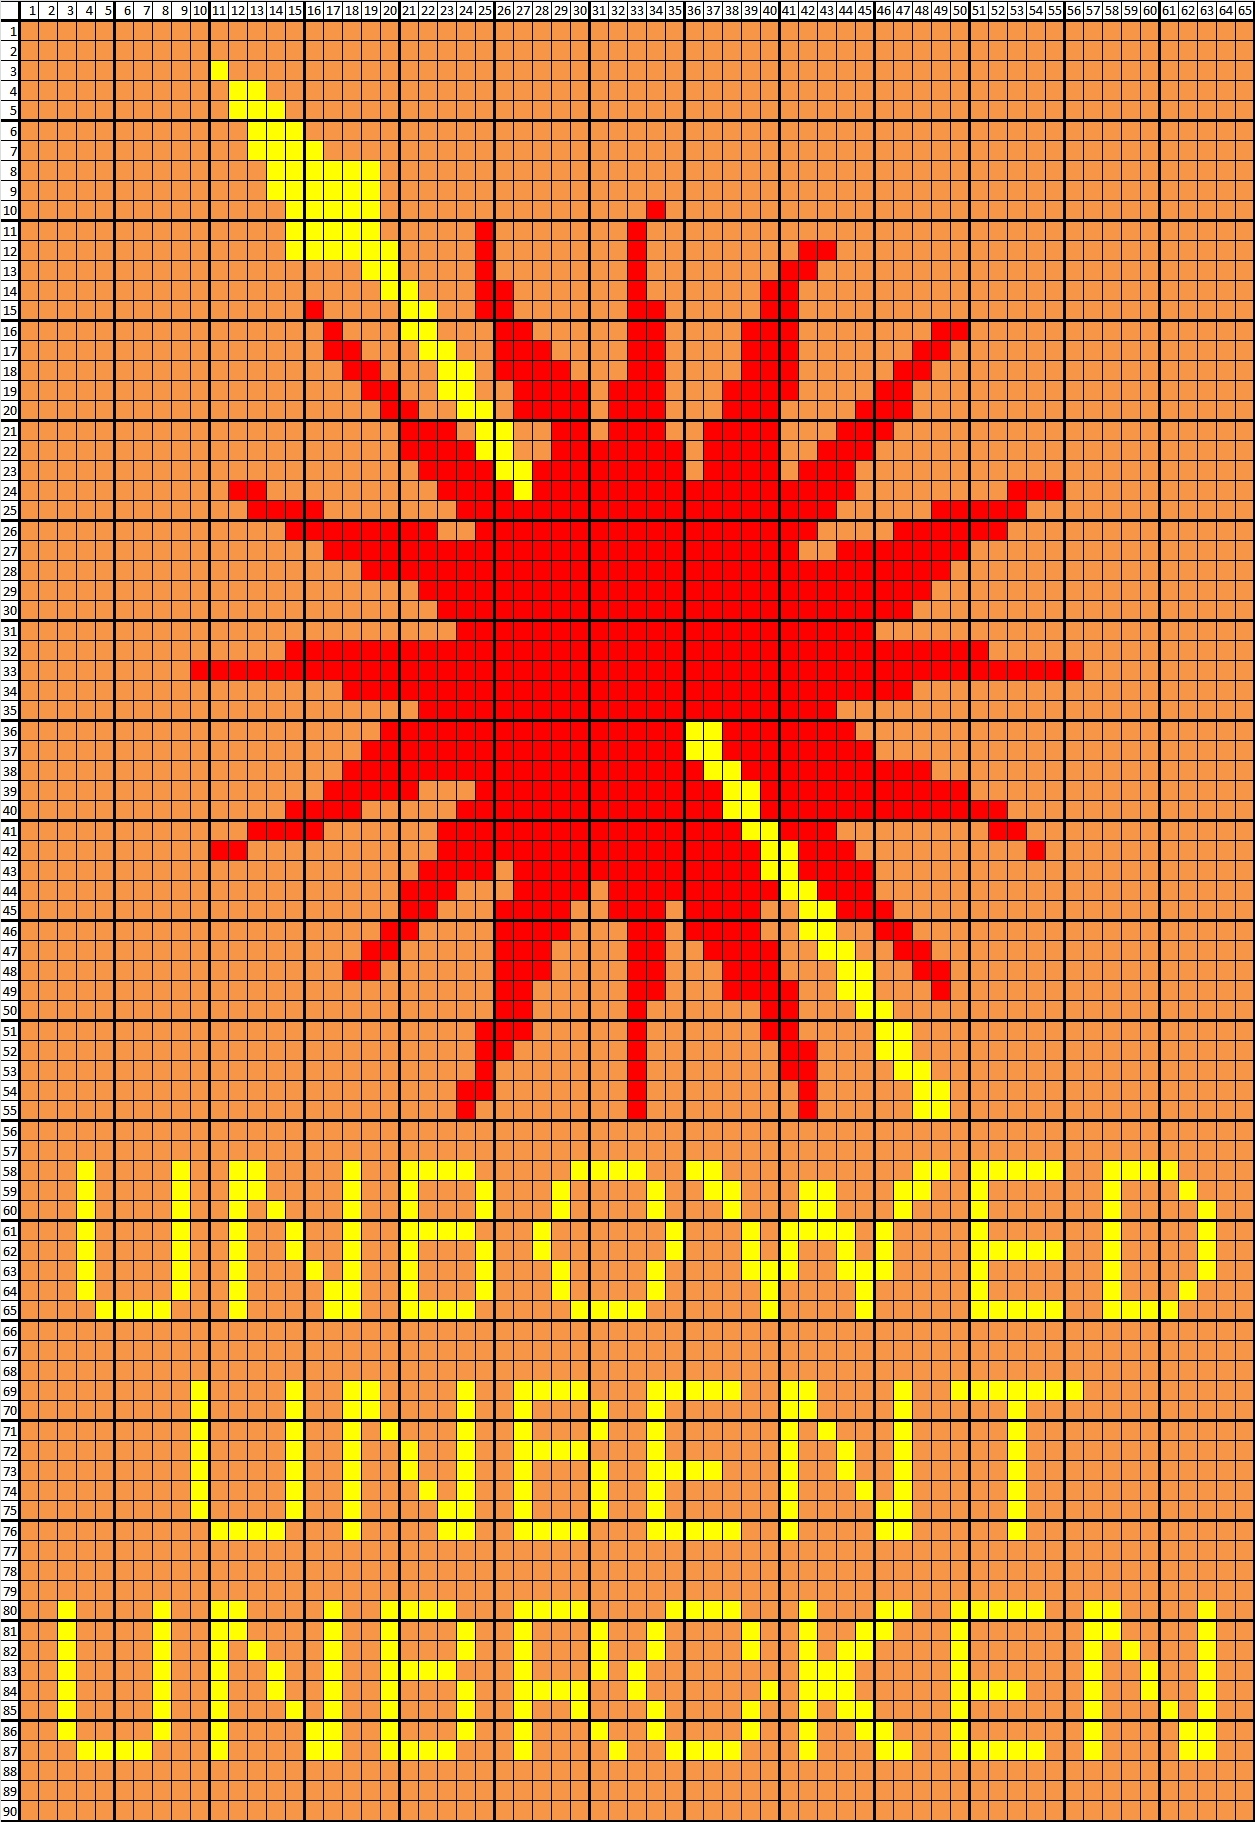
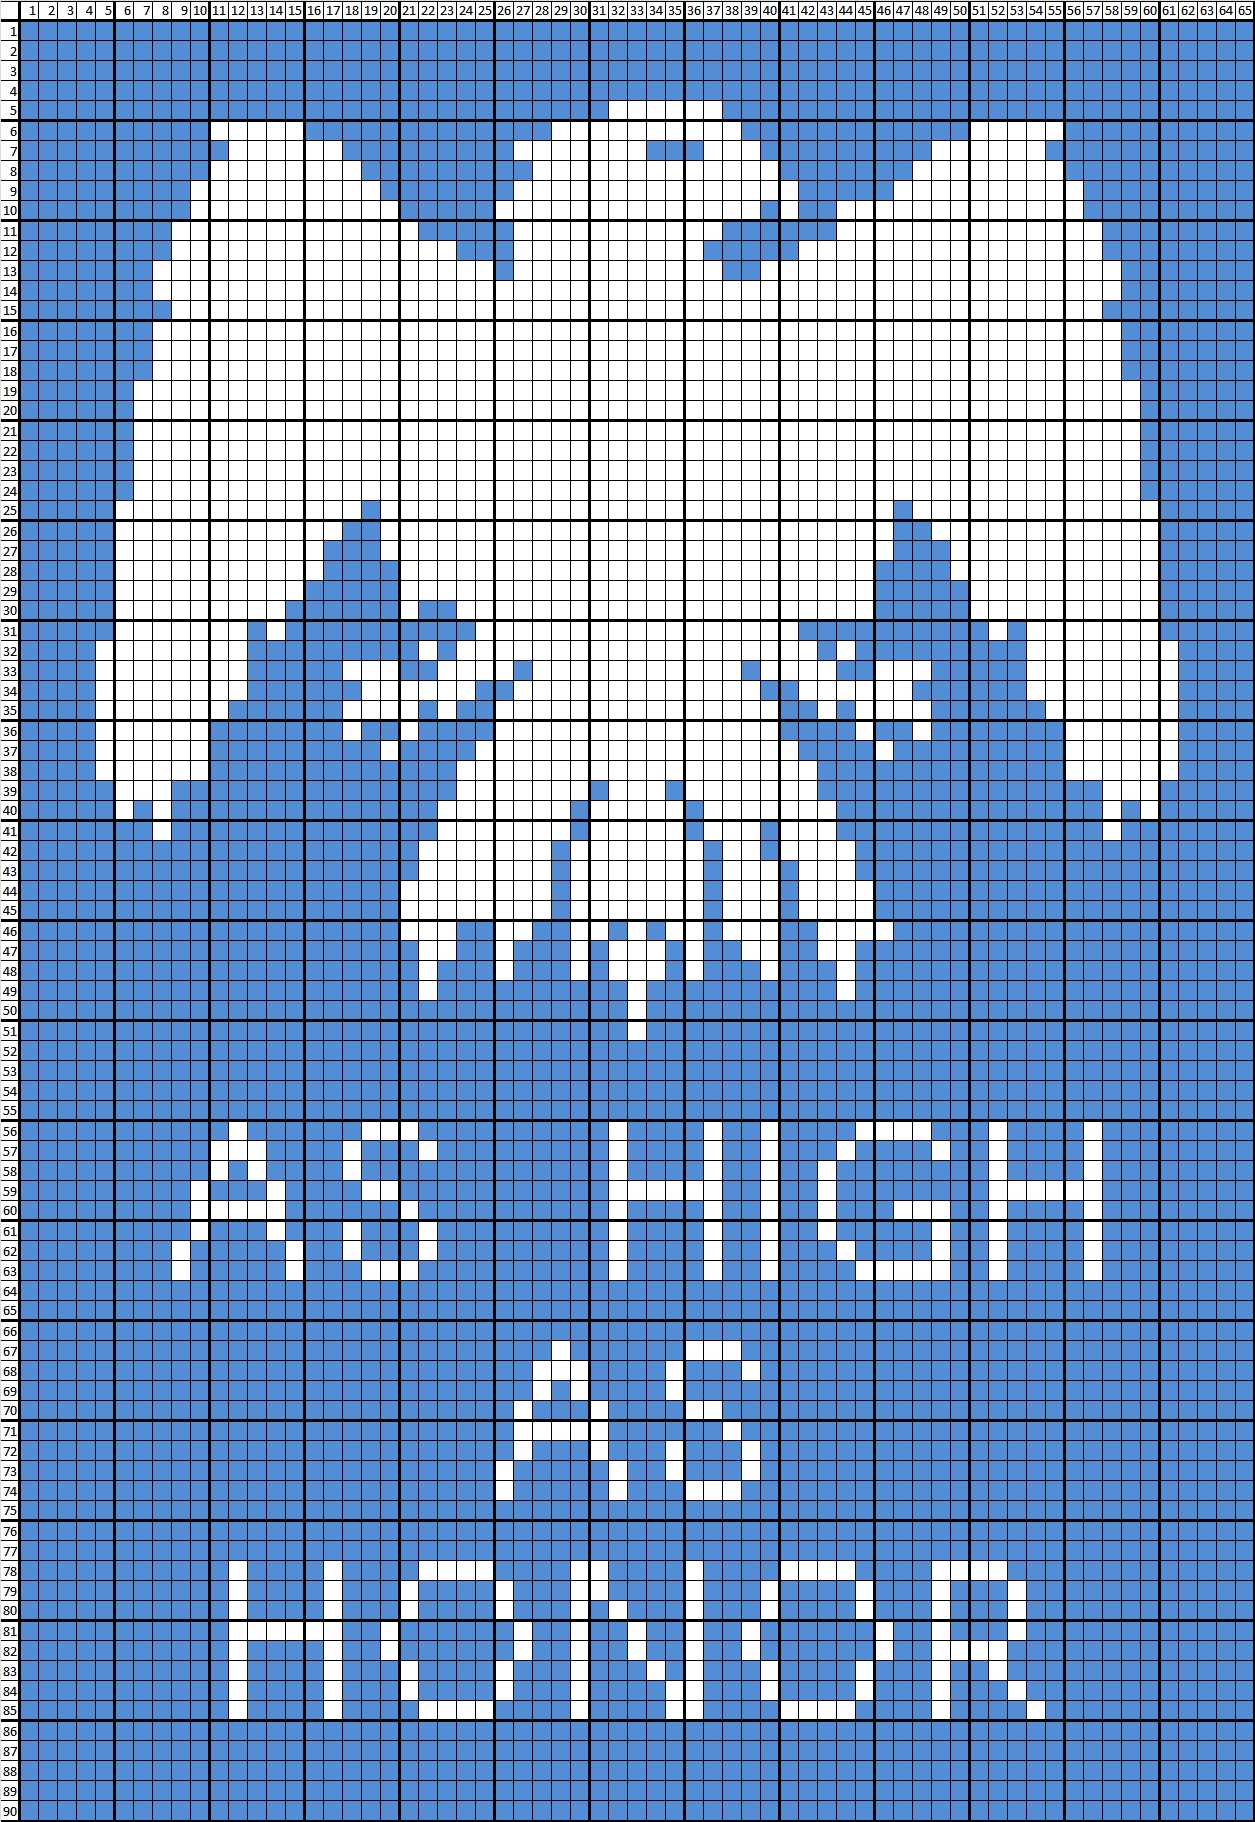
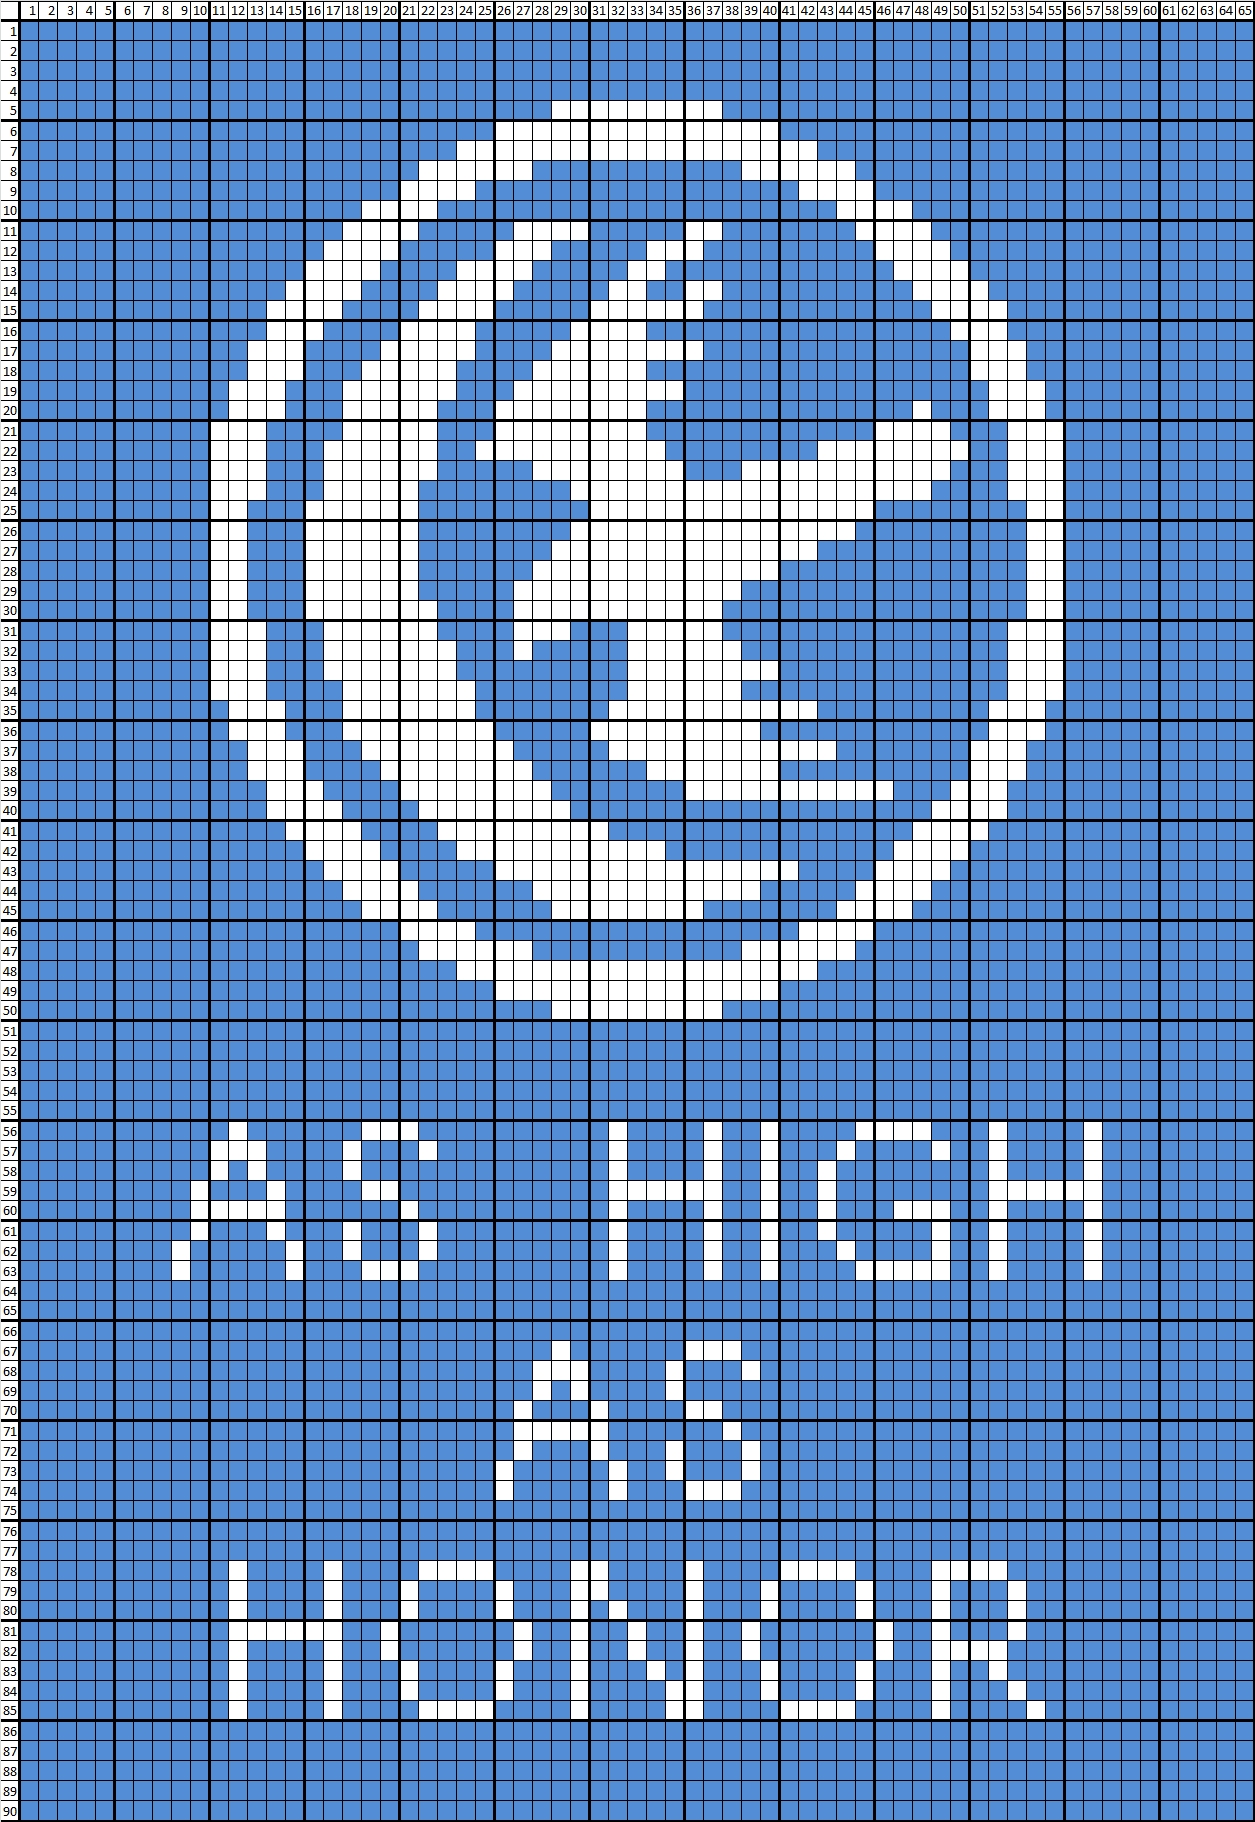
Each panel chart is 90 x 65 pixels (one pixel = single crochet) and each finished panel measures approx. 23” x 19” after the border is added.
Finished dimensions of blanket: Approx 6’ x 5’
Gauge doesn’t strictly matter, but make sure to keep the tension of each panel consistent so they turn out the same size. I recommend blocking each panel as you finish them.
How to Read the Charts
Each chart is working from right to left and bottom to top, not counting the chain. There are 65 pixels (stitches) across, and 90 up. Start by chaining 66 of the first row’s colour, then the first stitch of the first row is the first pixel in the bottom right corner of the chart. One pixel corresponds to one single crochet. For the odd rows you’ll be working from the front, and for the even rows you’ll flip it and be working from the back. Make sure the ends are always hanging to the back/wrong side of the blanket – so sometimes they will be facing you, and other times they will be on the other side from you.
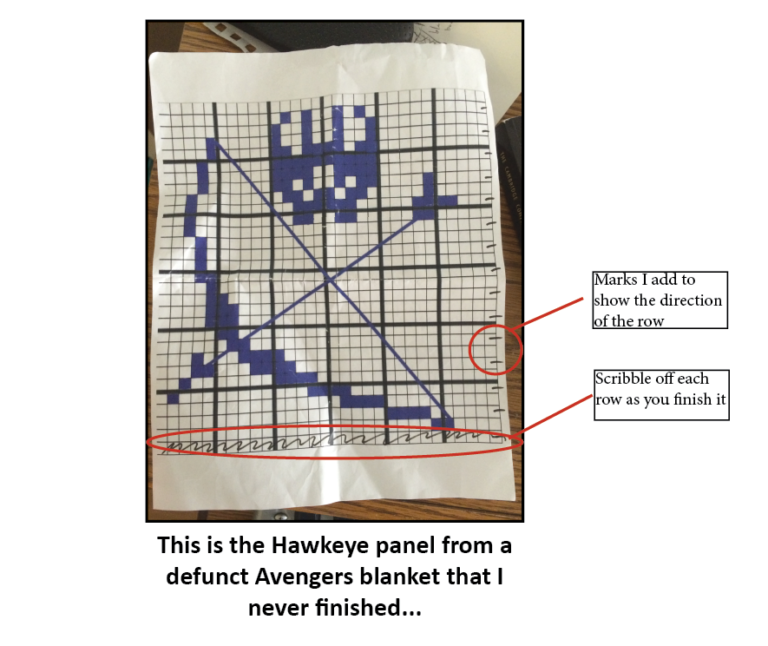
I subdivided each chart into 5×5 boxes since it helps me count my stitches. I like to make a little mark beside each row so I know which direction I’m going, and I cross off/scribble out each row in sharpie as I finish them. Like this:
Notes on Colour Changes
There are various techniques for changing colours, so it really just depends on your preference and whether or not you care about what the back looks like. I’ve detailed a couple of options below, with the pros and cons of each method.
It’s important to crochet tightly so the second colour doesn’t bleed through, but personally I find it will still be visible especially when you’re switching between a dark and a light colour. The benefit of this method is that it avoids having to weave in many ends, both the back and the front of the blanket will look clean, and the entire blanket will be a consistent tension & weight (as long as you begin carrying the second colour behind at the start of each panel, so the entire panel will have 2 strands of yarn).
Option 2: Carry the second colour behind
Personally, I don’t really like Option 1 because the second colour always bleeds through a bit – or maybe I just crochet too loosely! Also, I decided to line mine in fleece so the back could look as terrible as I wanted. Therefore I carried each colour behind as I worked, or cut the yarn and picked it up later, depending on how far it would be until I needed it again.
To carry a colour behind, you do the following:
Change to the new colour, and let the old colour fall to the wrong side of the panel. The wrong side may be facing you OR facing away from you, depending on which row you’re on, so be careful! If you only have 3-4 stitches until you need that colour again, just leave it hanging there and then grab it again when you need it. If it’s more than that, you may want to cut the yarn. Alternatively, you can crochet a stitch over the hanging yarn every 3-4 stitches to secure it.
The downside of this method is that the back will have to be lined, you’ll have more ends to weave in, and the tension of each panel may be wonky. I ended up with some panels slightly larger than others, which made sewing them together challenging.
A final note on colour changes
Due to the nature of crochet stitches there tends to be gaps sometimes between colour changes, which can be an issue in particular with the words (it’ll make parts of the letters look like they’re not attached to other parts). I just filled in the gaps after with yarn – often using the yarn ends, since I had to weave those in anyway.
Adding the Panel Borders
I added a border of two rows to each panel using single crochet. The first row I did in the contrasting colour for that panel (ie. for Lannister I used gold – see below), and the second row I did in black. Some panels, such as Stark and Baratheon, will have two black rows, since the contrasting colour is black.
Assembling the Blanket
Once you’ve finished all 9 panels, it’s time to assemble the blanket! I decided to crochet them together, and found a tutorial online with different options. For example, this tutorial has several methods you can use: http://www.woolcrafting.com/crochet-seams.html
You may also decide to back the blanket once it is done. I used black fleece and sewed all around the edges of the blanket and along the borders between each panel with my sewing machine. It’s a challenge because the fabric + yarn will be thick, but go slow and it will be ok!
Join my newsletter and receive your FREE guide to the Five Essential Amigurumi Techniques!
Game of Thrones Crochet Blanket Charts
Each chart is included below in PDF and JPF formats.
I have included two versions of House Arryn. The first is the one I used in my original blanket, based on an version of their house sigil that I’d found online. The second is the screen accurate version.
Finally, I have also included a BONUS chart for House Mormont, that you can use in lieu of one of the 9 main houses. Or just make a separate panel to hang on your wall to honour the amazing badass warrior that is Lyanna Mormont!
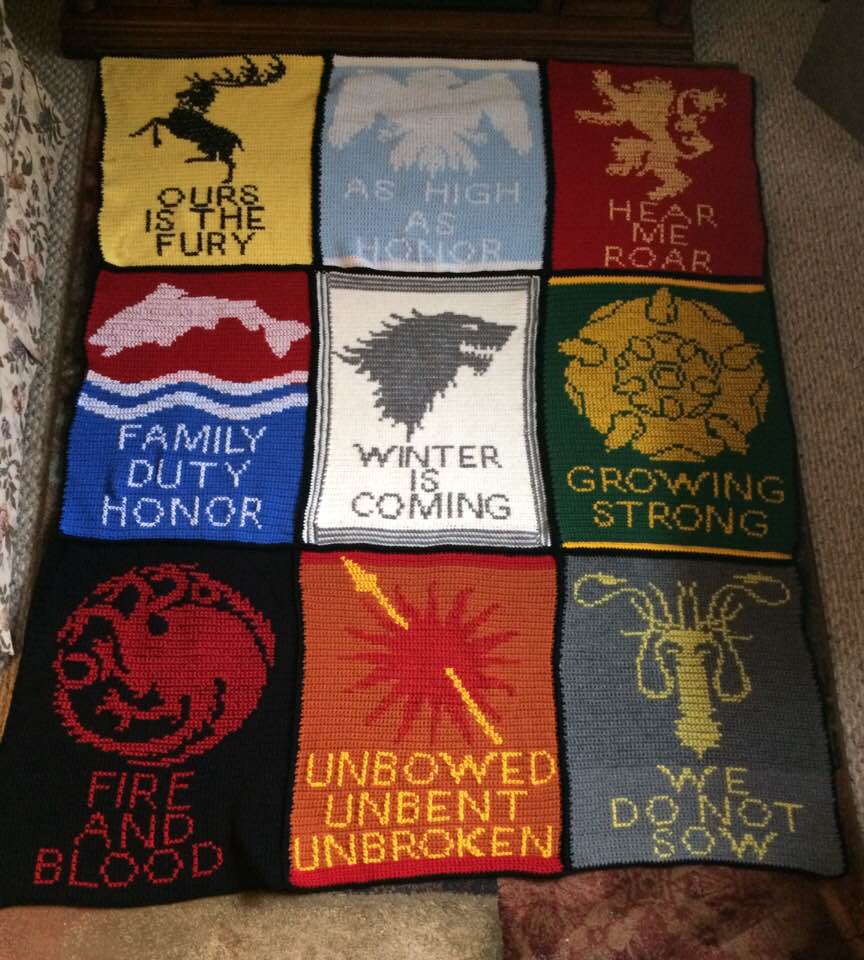
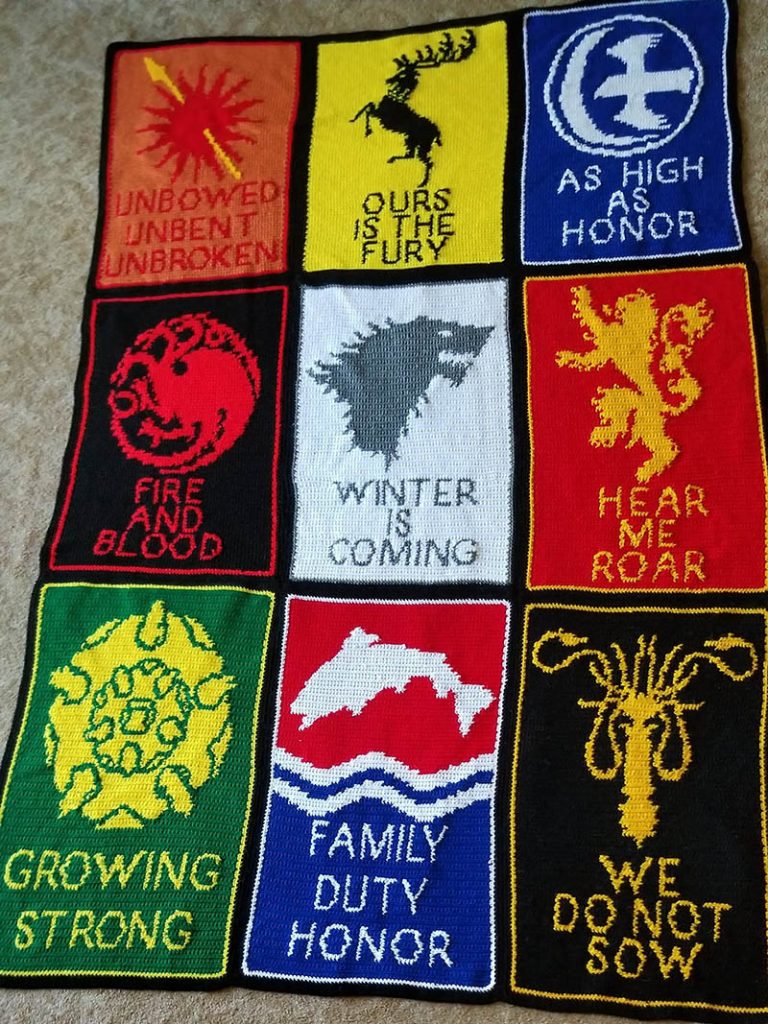
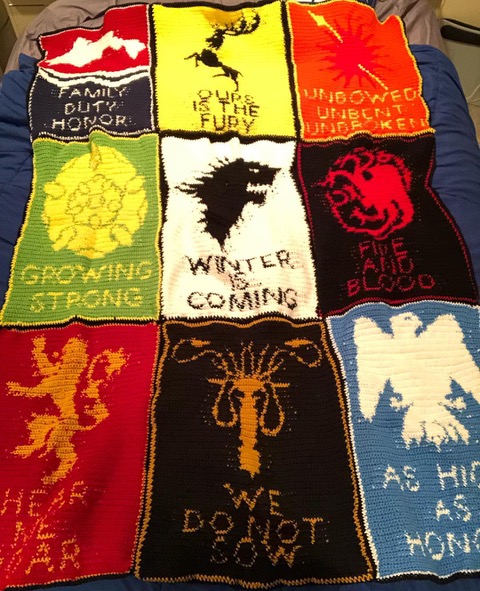
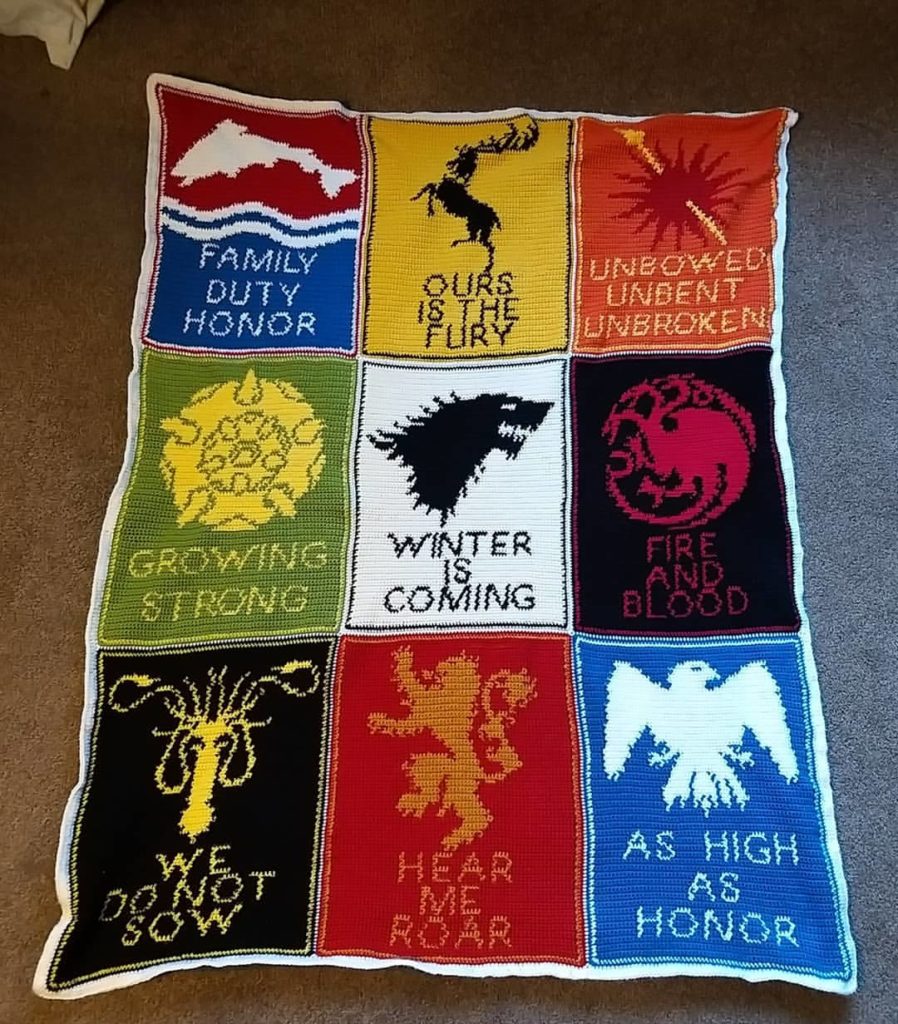
Several people have sent over pictures of their blankets, and it’s always so rewarding for me to see them. <3 Check out my blanket gallery below, and if you’d like to have yours added please send it on over!
Blanket by Maria da Luz Teixeira - knitted!
Blanket by @handmade_by_asti on Istagram
Blanket by Debbie Bryant Lee
Blanket by Kelly Sanders (with custom Arryn chart she created, before I made my screen-accurate version)
Blanket by Alex Greenberg, @16note on Instagram
Blanket by Bethany Edwards
Blanket by @helens.crochet.corner on Instagram
I hope you enjoy this pattern, and if you have any questions please don’t hesitate to comment below or email me.
And if you made your own Game of Thrones blanket I would love to see a picture on Instagram! Make sure to tag me so I don’t miss it, @waywardpineapplecreations.
You are beyond amazing, and patient, and super cool! I have been working on a Game of Thrones inspired blanket for my son for over a year-and-a-half and I keep putting it down while brainstorming on how to represent the other houses in my squares. I only did one square like yours using the intarsia method, the winter is coming one, but I found out too late that the pattern I was using had a mistake on the word "is". I just don't have the heart to rip it all out since that was near the beginning, but after seeing your blanket and newly inspired! Have about 18 squares so far and now I have the motivation to finish! Thank you for sharing yours with us, it's beautiful!
Hi! I love this blanket and I'm trying to make it as a Christmas present. I've tried this 4 times now, about to start it again tonight, my 5th attempt! I think I've gotten myself confused! So do I start at the bottom, line 90 then 89, 88, 87 ect?
Since 90 is an even number is this the back of the project?
I should work right to left on the first row, but then do I turn my work, chain one, and then follow the graph from left to right?
Sorry for all the questions! Hope you can answer them! Thanks!
Sorry for the confusion! Yes, row 90 is the bottom, you're going to start in the bottom right. Chain 66, then work the first row from right to left (65 stitches). Chain 1, turn your work, then work the second row from left to right. When you're going right to left you're working on the front. So row 1 is the front, row 2 is the back, etc. Hope that's clear! 🙂 – Julia
I've been working on crocheting your patterns for this blanket over the past couple weeks but when I went today to get the pattern for my next square, I just get a message that says "File deleted from server." Are these still available? I'd hate to be unable to finish!
Hi Chelsea – thanks for letting me know! I've re-uploaded them all so they should work. Let me know if you have trouble downloading any of them, though. – Julia
Hi Holly! Thanks for commenting. You should be able to access the patterns for free without entering any bank info. They can all be found here: http://vancouvercraftygeeks.blogspot.ca/p/game-of-thrones-c.html When you click on one of the links it goes to the TinyUpload download page, and from there you just click on the name of the file to download. Let me know if you're having problems with it, though!
Awesome blanket! I just got Into the Game of Thrones show and even just finished the first season today! I even can’t wait to read the books! In the middle of one of the episodes I just randomly thought “how cool would it be if I made a game of thrones afghan?” Haha I was so consumed on the thought I even paused mid-episode to start searching for some ideas! Pintrest was the first place I looked and most afghans looked super hard! I’ve only made 1 Afghan and am in the middle of making a Harry Potter Afghan for my boyfriend for his birthday. Then I found Yours! I’m sure it isn’t an easy project but not super hard either, it will be the most challenging thing for me to crochet so far but I’m super excited and look forward to crocheting it! I had one question, for the back did you just weave in all the ends or did you crochet a big piece and sewed it to the front?(the game of thrones piece) if you did crochet a whole back for this how many skeins of yarn did you use?
Thanks for the comments, Alyssa! Happy to hear you like the blanket, and yay for getting into the show – hope you enjoy the rest of it!! I weaved in the ends, but I also carried the yarn behind the work quite a lot, so there are a bunch of ugly loops on the back. Therefore I sewed a big piece of black fleece to the back. In the ‘colour changes’ section of the post I talk a bit about different options, but let me know if you have any questions.
Also congrats on the new blog, that’s awesome! 🙂 Just getting it set up is a big first step. I’ve let mine languish a lot, but am trying to get back to it now. Send me a link when you post the blanket, I’d love to see it!
Hello, your blanket is absolutely stunning! I would like to do it for the GOT-obsessed members of my family, do you know approximately how much meters are needed for this blanket in each colour please ? Thank you by advance et have a nice day
Hi Diane! Thanks for your message, I’m glad you like my pattern. 🙂 That’s a good question – I’m not entirely sure, but I can figure it out. I’ve started a spreadsheet to calculate the approx yardage, but might need a day or two because I’m going to be busy the next two days helping my grandmother to move. To give you an idea, I just worked out Stark and I’d say approx 65 metres of black (or 20% of a Red Heart Super Saver skein) and 202 metres of the off-white (or 60% of a Red Heart skein). I’ll get to the others soon, this would be useful info for me to include in the pattern anyway so thanks for asking! 🙂
Hi Diane, thanks for your patience! Here’s what I worked out in metres, roughly. I also noted the approx number of Red Heart Super Saver skeins needed per colour:
So pretty much, if you’re using RHSS, you’d need to buy 3 skeins of black, 2 skeins each of red and yellow, and 1 each of the rest. That should do it! Hope that helps, and I’d love to see your finished blanket when it’s done. 🙂
Hello, thank you so much for taking the time to calculate all the blanket ! I can’t wait to begin mine ! 😍
Hello!
Love the blanket and I plan on making it, but do you have instructions for the Game of Thrones writing and the Nights Watch writing so I can add that in?
Thank you!
Hey, thank you for sharing this amazing blanket! I just have a doubt about Baratheon panel, what is that circle? I can’t find it but maybe is my bad English fault 😅 So please help me! And thank you again 😊
Hi Silvia! I’m glad you like the blanket. 🙂 Do you mean the little circles on the crown around its neck? Those can just be embroidered on if you want them. They just don’t show up well on the pictures of my finished blanket, but I think I did include them. Hope that helps clarify? -Julia
Hello! I’m about to finish this pattern and I’m in love with it I never thought I would be able to do a project this big, but it’s been a breeze. I was just wondering about the backing fabric, I know you said you used fleece, but do you think you could use you could use any other fabrics if someone isn’t a fan of fleece?
Hi Jessica! That’s awesome, congrats on finishing it – I know, big projects can be overwhelming! When I got the idea to make this blanket I immediately went “no that’s crazy”, but my friend convinced me to do it and I’m glad I did. Anyway, yes, honestly I recommend something other than fleece unless you want it super warm. The yarn is heavy enough, and with the fleece added it’s even warmer and heavier. A light cotton or something would work fine, maybe check out your local fabric store and look for something nice and soft but not heavy? Good luck with it (I know sewing the fabric on at the end is a bit terrifying, but just go slow if you’re using a machine), and I’d love to see a picture when you’re done. 🙂
-Julia
I don’t specifically have a knitted version, but the chart should work for either crochet or knitting. 🙂 I don’t knit, however, so I’m not sure exactly how it would turn out. I think it would work ok though!
Hi I’m a beginner and really love GOT and want to make this but I am left handed and struggling a bit please if you can help or give any tips I’d really appreciate it I really want make this <3
Hi Bianca! Thank you for the message, and apologies for the delayed response. Honestly I don’t have much experience with left handed crochet, but I researched a bit and to my understanding you can simply start in the bottom left hand corner instead of the bottom right corner, and it should work. The odd-numbered rows will therefore be the wrong side of the blanket, and the even-numbered rows will be the right side of the blanket. Below is my “How to Read the Charts” section of the blog post, tweaked slightly for left-handed crocheters. 🙂 Hope this helps! Good luck with it!
Each chart is working from left to right and bottom to top, not counting the chain. There are 65 pixels (stitches) across, and 90 up. Start by chaining 66 of the first row’s colour, then the first stitch of the first row is the first pixel in the bottom left corner of the chart. One pixel corresponds to one single crochet. For the odd rows you’ll be working from the back, and for the even rows you’ll flip it and be working from the front. Make sure the ends are always hanging to the back/wrong side of the blanket – so sometimes they will be facing you, and other times they will be on the other side from you.


34 thoughts on “Free Pattern: Game of Thrones Crochet Blanket”
Hey there! Any news for the other patterns? Your work is amazing 🙂
Thanks Chiara! Yes, I posted the rest of the houses, they're on my patterns page at http://vancouvercraftygeeks.blogspot.com/p/patterns.html?m=1
Enjoy, and let me know if you have any questions! If you make one I'd love to see the finished blanket or panel.
I completed 5 out 9 panels! ;D
That's awesome! Looking forward to seeing when it's done! 🙂
Thank you so much! You'll have news from me soon 🙂
This is amazing! I think I want to make one for myself
You are beyond amazing, and patient, and super cool! I have been working on a Game of Thrones inspired blanket for my son for over a year-and-a-half and I keep putting it down while brainstorming on how to represent the other houses in my squares. I only did one square like yours using the intarsia method, the winter is coming one, but I found out too late that the pattern I was using had a mistake on the word "is". I just don't have the heart to rip it all out since that was near the beginning, but after seeing your blanket and newly inspired! Have about 18 squares so far and now I have the motivation to finish! Thank you for sharing yours with us, it's beautiful!
Hi! I love this blanket and I'm trying to make it as a Christmas present. I've tried this 4 times now, about to start it again tonight, my 5th attempt! I think I've gotten myself confused! So do I start at the bottom, line 90 then 89, 88, 87 ect?
Since 90 is an even number is this the back of the project?
I should work right to left on the first row, but then do I turn my work, chain one, and then follow the graph from left to right?
Sorry for all the questions! Hope you can answer them! Thanks!
Sorry for the confusion! Yes, row 90 is the bottom, you're going to start in the bottom right. Chain 66, then work the first row from right to left (65 stitches). Chain 1, turn your work, then work the second row from left to right. When you're going right to left you're working on the front. So row 1 is the front, row 2 is the back, etc. Hope that's clear! 🙂 – Julia
Thank you so much for the reply! Going to try again tonight! 🙂
I've been working on crocheting your patterns for this blanket over the past couple weeks but when I went today to get the pattern for my next square, I just get a message that says "File deleted from server." Are these still available? I'd hate to be unable to finish!
Hi Chelsea – thanks for letting me know! I've re-uploaded them all so they should work. Let me know if you have trouble downloading any of them, though. – Julia
They are working perfectly now! Thank you so much! 🙂
Hi Julia, the blanket looks fab. Is there anyway to access the patterns without entering a bank card? Many thanks, Holly
Hi Holly! Thanks for commenting. You should be able to access the patterns for free without entering any bank info. They can all be found here: http://vancouvercraftygeeks.blogspot.ca/p/game-of-thrones-c.html When you click on one of the links it goes to the TinyUpload download page, and from there you just click on the name of the file to download. Let me know if you're having problems with it, though!
This blanket looks interesting. I may have to give it a go. Thank you so much for providing the pattern. 🙂
Awesome blanket! I just got Into the Game of Thrones show and even just finished the first season today! I even can’t wait to read the books! In the middle of one of the episodes I just randomly thought “how cool would it be if I made a game of thrones afghan?” Haha I was so consumed on the thought I even paused mid-episode to start searching for some ideas! Pintrest was the first place I looked and most afghans looked super hard! I’ve only made 1 Afghan and am in the middle of making a Harry Potter Afghan for my boyfriend for his birthday. Then I found Yours! I’m sure it isn’t an easy project but not super hard either, it will be the most challenging thing for me to crochet so far but I’m super excited and look forward to crocheting it! I had one question, for the back did you just weave in all the ends or did you crochet a big piece and sewed it to the front?(the game of thrones piece) if you did crochet a whole back for this how many skeins of yarn did you use?
Thanks for the comments, Alyssa! Happy to hear you like the blanket, and yay for getting into the show – hope you enjoy the rest of it!! I weaved in the ends, but I also carried the yarn behind the work quite a lot, so there are a bunch of ugly loops on the back. Therefore I sewed a big piece of black fleece to the back. In the ‘colour changes’ section of the post I talk a bit about different options, but let me know if you have any questions.
Also congrats on the new blog, that’s awesome! 🙂 Just getting it set up is a big first step. I’ve let mine languish a lot, but am trying to get back to it now. Send me a link when you post the blanket, I’d love to see it!
Hello, your blanket is absolutely stunning! I would like to do it for the GOT-obsessed members of my family, do you know approximately how much meters are needed for this blanket in each colour please ? Thank you by advance et have a nice day
Hi Diane! Thanks for your message, I’m glad you like my pattern. 🙂 That’s a good question – I’m not entirely sure, but I can figure it out. I’ve started a spreadsheet to calculate the approx yardage, but might need a day or two because I’m going to be busy the next two days helping my grandmother to move. To give you an idea, I just worked out Stark and I’d say approx 65 metres of black (or 20% of a Red Heart Super Saver skein) and 202 metres of the off-white (or 60% of a Red Heart skein). I’ll get to the others soon, this would be useful info for me to include in the pattern anyway so thanks for asking! 🙂
Hello, thanks for your reply and sorrt for the additionnal work ! Good luck with your gran and have a nice day
Hi Diane, thanks for your patience! Here’s what I worked out in metres, roughly. I also noted the approx number of Red Heart Super Saver skeins needed per colour:
Black – 756m (2.3 RHSS skeins)
Off-White (Stark) – 223m (0.7 RHSS skeins)
Gold – 58m (0.2 RHSS skeins)
Red – 467m (1.4 RHSS skeins)
Yellow – 397m (1.2 RHSS skeins)
White – 116m (0.3 RHSS skeins)
Blue – 238m (0.7 RHSS skeins)
Orange – 229m (0.7 RHSS skeins)
Green – 214m (0.6 RHSS skeins)
So pretty much, if you’re using RHSS, you’d need to buy 3 skeins of black, 2 skeins each of red and yellow, and 1 each of the rest. That should do it! Hope that helps, and I’d love to see your finished blanket when it’s done. 🙂
Hello, thank you so much for taking the time to calculate all the blanket ! I can’t wait to begin mine ! 😍
Hello!
Love the blanket and I plan on making it, but do you have instructions for the Game of Thrones writing and the Nights Watch writing so I can add that in?
Thank you!
Thanks Kaitlin, I’m glad you like it! I’m sorry I don’t have a pattern for the writing, though.
-Julia
Darn! Thank you though! It will still be amazing!
Hey, thank you for sharing this amazing blanket! I just have a doubt about Baratheon panel, what is that circle? I can’t find it but maybe is my bad English fault 😅 So please help me! And thank you again 😊
Hi Silvia! I’m glad you like the blanket. 🙂 Do you mean the little circles on the crown around its neck? Those can just be embroidered on if you want them. They just don’t show up well on the pictures of my finished blanket, but I think I did include them. Hope that helps clarify? -Julia
Hello! I’m about to finish this pattern and I’m in love with it I never thought I would be able to do a project this big, but it’s been a breeze. I was just wondering about the backing fabric, I know you said you used fleece, but do you think you could use you could use any other fabrics if someone isn’t a fan of fleece?
Hi Jessica! That’s awesome, congrats on finishing it – I know, big projects can be overwhelming! When I got the idea to make this blanket I immediately went “no that’s crazy”, but my friend convinced me to do it and I’m glad I did. Anyway, yes, honestly I recommend something other than fleece unless you want it super warm. The yarn is heavy enough, and with the fleece added it’s even warmer and heavier. A light cotton or something would work fine, maybe check out your local fabric store and look for something nice and soft but not heavy? Good luck with it (I know sewing the fabric on at the end is a bit terrifying, but just go slow if you’re using a machine), and I’d love to see a picture when you’re done. 🙂
-Julia
Is there a knitted version of this
Hi Jacqueline,
I don’t specifically have a knitted version, but the chart should work for either crochet or knitting. 🙂 I don’t knit, however, so I’m not sure exactly how it would turn out. I think it would work ok though!
Julia
Hi I’m a beginner and really love GOT and want to make this but I am left handed and struggling a bit please if you can help or give any tips I’d really appreciate it I really want make this <3
Hi Bianca! Thank you for the message, and apologies for the delayed response. Honestly I don’t have much experience with left handed crochet, but I researched a bit and to my understanding you can simply start in the bottom left hand corner instead of the bottom right corner, and it should work. The odd-numbered rows will therefore be the wrong side of the blanket, and the even-numbered rows will be the right side of the blanket. Below is my “How to Read the Charts” section of the blog post, tweaked slightly for left-handed crocheters. 🙂 Hope this helps! Good luck with it!
Each chart is working from left to right and bottom to top, not counting the chain. There are 65 pixels (stitches) across, and 90 up. Start by chaining 66 of the first row’s colour, then the first stitch of the first row is the first pixel in the bottom left corner of the chart. One pixel corresponds to one single crochet. For the odd rows you’ll be working from the back, and for the even rows you’ll flip it and be working from the front. Make sure the ends are always hanging to the back/wrong side of the blanket – so sometimes they will be facing you, and other times they will be on the other side from you.